Module Federation in webpack5
들어가면서
개인적으로 개발을 하면서 가장 많이 소스가 겹치는 분야는 FrontEnd 개발이었던 것 같다. 현재 팀이 쓰고 있는 백엔드의 경우, 기능별로 나눠져 있어서 크게 겹칠 일이 없었는데 프론트엔드는 특히 한 레포지토리를 수백명이 바라보는 구조라 이러한 경우, 기존의 git flow도 제대로 역할을 하지 못하게 되고, 커밋이 잘못되어 revert하는 일도 종종 있었다. 이러한 경우, 가장 좋은 것은 화면의 레이아웃 별로 조그마한 Micro Frontend 페이지 형식으로 레포를 나누는 것을 생각해 봐야한다.
참고자료 https://mobicon.tistory.com/572
Micro Frontend란?
전체 화면을 작동할 수 있는 단위로 나눠 개발한 후 서로 조립하는 방식. 여기서 작동 단위에 사용 프론트엔드 프레임워크로 Vue, React 상관없이 조합가능한 방법을 이용한다.

Micro Frontend의 장점
- 작고, 응집력 있고, 유지보수성을 가지는 코드베이스를 가질 수 있다.
- 분리배포가 용이하고, 자율적인 팀 조직 운영이 가능하다.
- 프론트엔드 개발을 점진적 업그레이드 또는 재직성이 용이하다.
Micro Frontend의 단점
- 배포 번들 사이즈가 커질 수 있다.
- 서로간의 개발 환경 차이로 복잡도가 올라간다.
- 운영 및 거버넌스도 올라간다.
통합 방법
-
서버 템플릿 통합: 각 서버로 html 템플릿을 요청하고, 최종 응답서버에서 각 템플릿을 조합해서 응답을 보냄 -> 서버측에서 최종 화면을 조합한다.
- 빌드타임 통합: 단위 애플리케이션을 패키지로 배포하고, package.json에 명시한 후 컨테이너 애플리케이션에서 import하여 사용하는 방법 (팀에서 사용함)
- 각 애플리케이션에 대한 런타임 대응이 안된다.
- 애플리케이션을 릴리즈하고 최종 애플리케이션에서 컴파일해야 한다.
- iframe 통합: 전통적인 방식이면서 가장 쉬운 방식이다.
- routing, history, deep-link같은 것이 복잡해질 수 있다.
- 컨테이너 애플리케이션과 iframe에 들어가는 단위 애플리케이션간의 통신규약도 필요하다.
- Javascript를 통한 런타임 통합: iframe과 달리 유연한 통합이 가능하다.
- 컨테이너 애플리케이션을 단위 애플리케이션 번들을 script 태그를 통합 다운로드 받고 약속된 초기화 메소드를 호출한다.
- 클라이언트측에서 (브라우져) 통합한다.
-
Web Components를 통한 통합: HTML 커스텀 엘리먼트를 통한 통합방법, static, runtime 통합 둘 다 가능함
- Webpack5 Module Federation
참고자료 https://fe-developers.kakaoent.com/2022/220623-webpack-module-federation/
Module Federation이란?
Webpack은 자바스크립트 모듈의 의존 관계를 파악하고 실행할 때 필요한 모듈을 로딩해주는 역할을 한다. 그러나 단일 Webpack 빌드에 포함되었던 모듈만 처리되므로 다른 Webpack 빌드의 결과물로 여러 서버에 배포되어 있는 모듈을 로딩할 수는 없었다. Module Federation은 단일 Webpack 빌드에 포함된 모듈뿐만 아니라 여러 서버에 배포되어 있는 원격 모듈을 하나의 애플리케이션에서 로딩할 수 있는 기능이다.
Webpack에서 모듈이란?
Webpack에서 모듈이라고 하는 것은 Webpack으로 빌드할 때 사용하는 코드를 포함한 모든 리소스를 말한다. 자바스크립트, CSS, HTML, JSON, 각종 이미지 파일 등이며 Module Federation을 이야기할 때 모듈은 특히 자바스크립트 모듈을 의미한다. 그러나 CSS, JSON 등의 다른 타입의 리소스들도 자바스크립트 모듈로 번들링할 수 있기 때문에 다른 타입의 리소스도 모듈이라고 말할 수 있다.
용어 정리
- 로컬 모듈 : 단일 Webpack 빌드에 포함되는 모듈. 서로 다른 webpack 빌드의 결과물은 서로 다른 로컬 모듈이다.
- 원격 모듈 : 다른 Webpack 빌드에서 만든 모듈을 대상으로 런타임에 로딩할 수 있는 모듈. Dyamic Imports 하듯 원격 모듈을 로딩할 수 있다.
- 컨테이너 : 각각의 빌드를 말하며, 하나의 빌드가 웹 어플리케이션을 나타낸다. A 컨네이너는 B 컨테이너의 원격 모듈을 로딩할 수 있으며 B에서 A 방향으로 로딩할 수 있다.
- Expose : 컨테이너가 외부에 노출한 원격 모듈의 목록을 나타내는 설정이다.
- 공유 모듈 : 여러 컨테이너에서 같이 사용할 모듈을 말하며, 런타임에 한번만 로딩한다.
- 리모트 앱 : 모듈을 Expose 하는 컨테이너이고, 호스트앱은 원격 모듈을 사용하는 컨테이너이다.
| 구분 | 기존 방식 | Module Federation 적용시 기대효과 |
|---|---|---|
| 빌드범위와 배포시간 | 작은 변경에도 전체 빌드를 하고 배포한다. | 변경된 컨테이너만 빌드하고 배포해서 시간이 줄어든다. |
| 영향도 | 전체 서비스를 대상으로 영향도를 검증한다. | 변경 영향이 해당 컨테이너에 국한되므로 검증 범위도 줄어든다. (단, 원격 모듈의 인터페이스를 변경했다면 호스트 앱도 검증이 필요하다.) |
| 로딩시간 | 전체 빌드가 변경되었으므로 배포 직후 로딩 시간도 오래 걸린다. (브라우저 캐시 적용 안됨) | 배포한 컨테이너의 원격 모듈만 새로 로딩하므로 배포 직후 로딩 시간도 상대적으로 짧다. |
참고자료 https://donggov.tistory.com/196
예시
파일구조
Integration
 - app (Header - 메인모듈)
 - menu
 - basket
Menu의 경우, Custom Component를 추가해서 app의 최하단에 붙일 예정.
dev 서버 설정
// vue.config.js
devServer: {
    port: 8000, // 8001, 8002
},
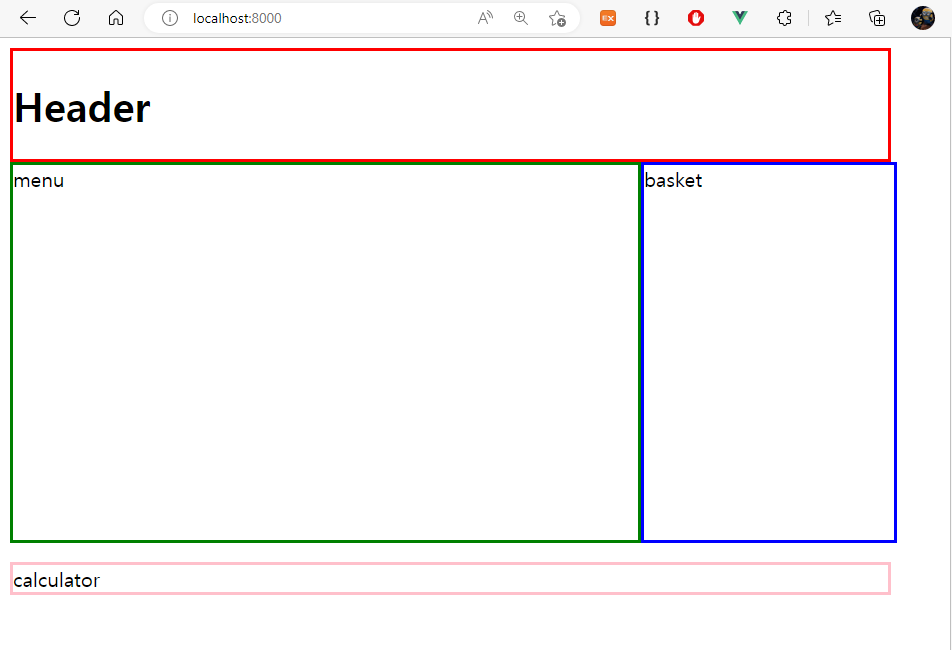
메인 모듈
<template>
  <div>
    <div>
      <div style="border: solid; border-color: red; width: 700px">
        <h1>Header</h1>
      </div>
    </div>

    <div style="display: flex; height: 300px">
      <div class="menu">menu</div>
      <div class="basket">basket</div>
    </div>
    <div class="calculator" style="border: solid; border-color: pink; width: 700px; margin-top: 20px;">calculator</div>
  </div>
</template>

<script>
import { defineComponent } from "vue";

export default defineComponent({
  name: "App",
});
</script>

<style>
.menu {
  border: solid;
  border-color: green;
  width: 500px;
  height: 100%;
}
.basket {
  border: solid;
  border-color: blue;
  width: 200px;
  height: 100%;
}
</style>
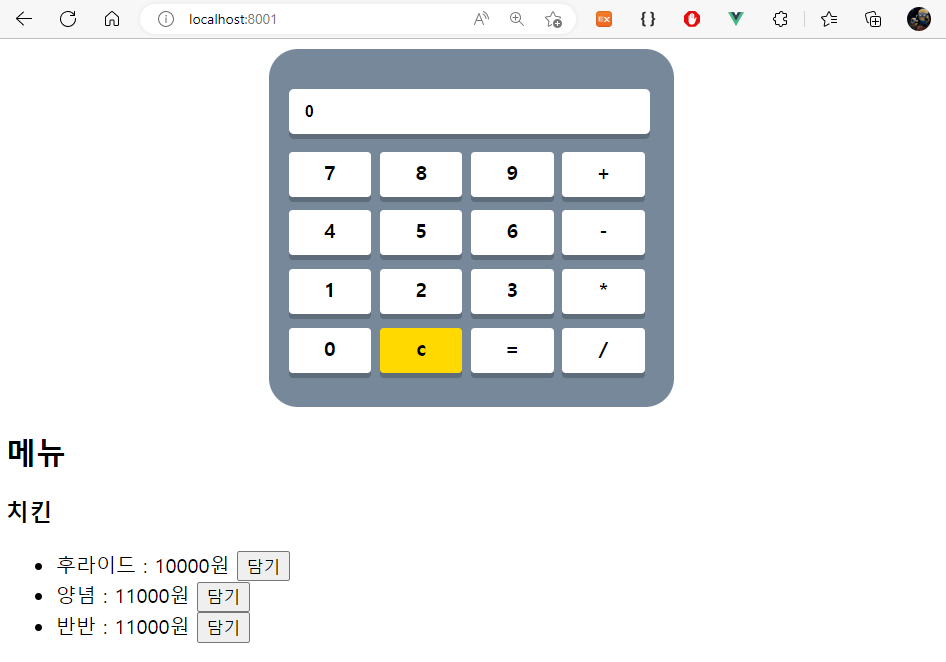
Menu
Chicken.vue
<template>
    <div>
      <h2>메뉴</h2>
      <h3>치킨</h3>
      <ul>
        <li v-for="(menu, index) in menus" :key="index">
           : 원
          <button>담기</button>
        </li>
      </ul>
    </div>
  </template>

  <script>
  import { defineComponent, reactive } from "vue";

  export default defineComponent({
    name: "MyChicken",
    setup() {
      const menus = reactive([
        { name: "후라이드", price: 10000 },
        { name: "양념", price: 11000 },
        { name: "반반", price: 11000 },
      ]);

      return { menus };
    },
  });
  </script>
Calculator.vue
<template>
  <div id="calWrap">
    <div class="top">
        <input type="text" v-model="total" />
    </div>
    <div id="keys">
        <div v-on:click="key(7)">7</div>
        <div v-on:click="key(8)">8</div>
        <div v-on:click="key(9)">9</div>
        <div v-on:click="key('+')">+</div>
        <div v-on:click="key(4)">4</div>
        <div v-on:click="key(5)">5</div>
        <div v-on:click="key(6)">6</div>
        <div v-on:click="key('-')">-</div>
        <div v-on:click="key(1)">1</div>
        <div v-on:click="key(2)">2</div>
        <div v-on:click="key(3)">3</div>
        <div v-on:click="key('*')">*</div>
        <div v-on:click="key(0)">0</div>
        <div v-on:click="clear()" class="clear">c</div>
        <div v-on:click="equal()">=</div>
        <div v-on:click="key('/')">/</div>
    </div>
  </div>
</template>

<script>
export default {
  name: 'MyCalculator',
  data(){
    return {
      total: 0
    }
  },
  methods :{
    key: function(num) {
            return this.total += num;
            },
            clear: function() {
            return this.total = 0;
            },
            equal: function() {
             let equal = this.total;
             return this.total = eval(equal);
            }
  }

}
</script>

<!-- Add "scoped" attribute to limit CSS to this component only -->
<style scoped>
/* ------------------------------------------------------------------
Google Fonts:
------------------------------------------------------------------ */
@import url(https://fonts.googleapis.com/css?family=Open+Sans:400,700);
/***********************************************************************************************/
/* =Common Styles */
/***********************************************************************************************/
body {
  font-family: 'Open Sans', sans-serif;
  background-color: #4894D6;
}
body #calWrap {
  background-color: #77889a;
  border-radius: 23px;
  padding: 2em 1em 1em 1em;
  margin: auto;
  width: 292px;
  clear: both;
  display: table;
}
body .top input {
  height: 36px;
  width: 90%;
  font-size: 13px;
  font-weight: bold;
  border-radius: 4px;
  margin: 0 0 14px 0;
  border: 0;
  padding: 0 1em;
  box-shadow: 0px 4px rgba(0, 0, 0, 0.2);
}
body #keys div {
  cursor: pointer;
  width: 66px;
  height: 36px;
  font-weight: bold;
  text-align: center;
  line-height: 2em;
  background: white;
  border-radius: 3px;
  box-shadow: 0px 4px rgba(0, 0, 0, 0.2);
  margin: 0 7px 11px 0;
  float: left;
  transition: all 0.2s ease;
}
body #keys div:hover {
  background-color: #D6D6D6;
}
body #keys .zero {
  width: 138px !important;
}
body #keys .clear {
  background-color: #ffd900 !important;
}

</style>
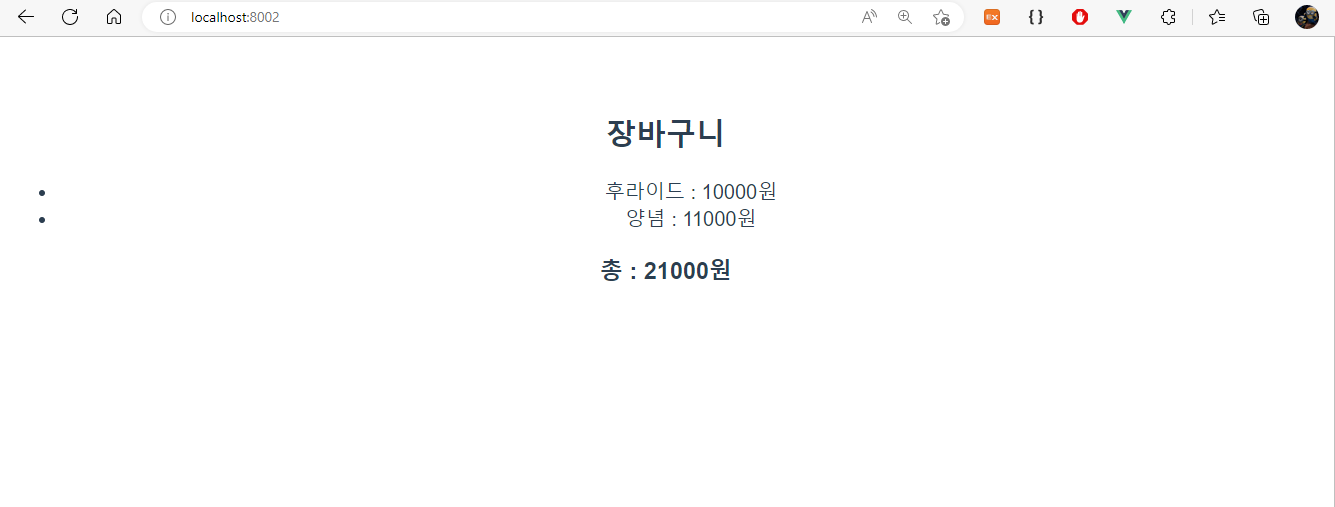
Basket
Basket.vue
<template>
    <div>
      <h2>장바구니</h2>
      <ul>
        <li>후라이드 : 10000원</li>
        <li>양념 : 11000원</li>
      </ul>
      <h3>총 : 21000원</h3>
    </div>
  </template>

  <script>
  import { defineComponent } from "vue";

  export default defineComponent({
    name: "MyBasket",
  });
  </script>
Module Federation 및 remote/host 설정
공유하는 애플리케이션을 remote로, 이곳을 사용하는 곳을 host로 설정한다. 여기서 app이 host, 나머지 모듈이 remote이다.
Module Federation - host 웹팩 설정
-
name : 현재 모듈명을 적어준다. 다른 애플리케이션과 중복을 피해야한다.
-
remotes : 불러올 컨테이너의 경로이다.
-
shared : 의존성 공유를 어떻게 할지 정의하는 설정이다. 현재 사용하는 라이브러리들을 공유하기로한다.
app/vue.config.js
const { defineConfig } = require('@vue/cli-service')
module.exports = defineConfig({
  transpileDependencies: true,
  devServer: {
    port: 8000, // 8001, 8002
  },
  publicPath: "http://localhost:8000",
  chainWebpack: (config) => {
    config.optimization.delete("splitChunks");
    config.plugin("module-federation-plugin").use(require("webpack").container.ModuleFederationPlugin, [
      {
        name: "main",
        remotes: {
          menu: "menu@http://localhost:8001/remoteEntry.js",
          basket: "basket@http://localhost:8002/remoteEntry.js",
        },
        shared: require("./package.json").dependencies,
      },
    ]);
  },
})
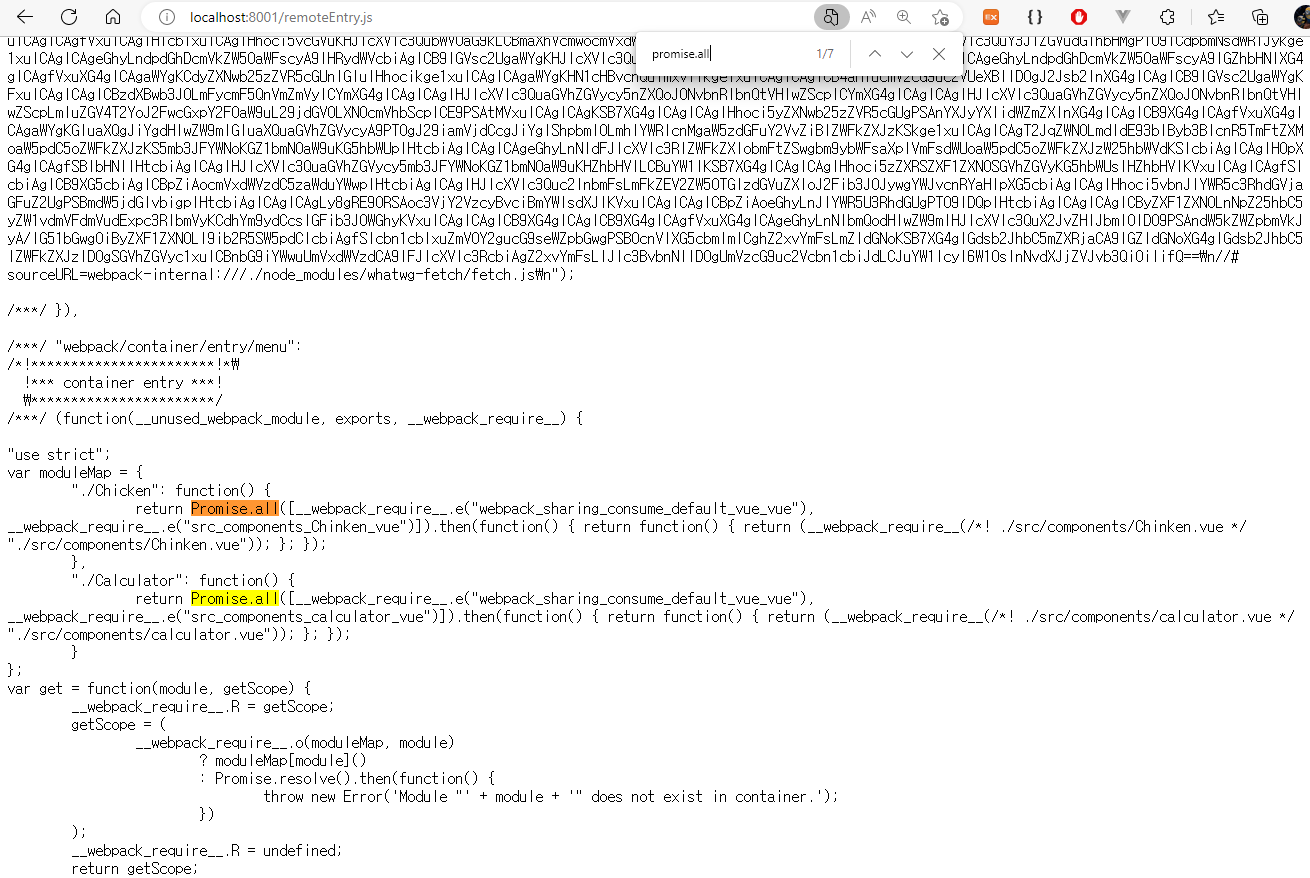
Module Federation - remote 웹팩설정
remote 설정을 하고나서 remoteEntry.js로 들어가보면 exposes한 컨테이너가 보이는걸 확인할 수 있다. 이건 빌드를 해야지 보임. 다만, 이렇게 설정하면, remote 서버에선 화면이 제대로 보이지 않는 문제가 있긴하다.. (Uncaught Error: Shared module is not available for eager consumption: webpack/sharing/consume/default/vue/vue) 아마 메인번들 로딩 순서에 따른 문제로 보임.. 나중에 한다면 deploy 단계에서 해당 소스를 적용하는식으로 해야되지 않을까 싶음
menu/vue.config.js
const { defineConfig } = require('@vue/cli-service')
module.exports = defineConfig({
  transpileDependencies: true,
  devServer: {
    port: 8001,
  },
  publicPath: "http://localhost:8001",
  chainWebpack: (config) => {
    config.optimization.delete("splitChunks");
    config.plugin("module-federation-plugin").use(require("webpack").container.ModuleFederationPlugin, [
      {
        name: "menu",
        filename: "remoteEntry.js",
        exposes: {
          "./Chicken": "./src/components/Chinken.vue",
          "./Calculator": "./src/components/calculator.vue",
        },
        shared: require("./package.json").dependencies,
      }
    ]);
  },
})
basket/vue.config.js
const { defineConfig } = require('@vue/cli-service')
module.exports = defineConfig({
  transpileDependencies: true,
  devServer: {
    port: 8002,
  },
  publicPath: "http://localhost:8002",
  chainWebpack: (config) => {
    config.optimization.delete("splitChunks");
    config.plugin("module-federation-plugin").use(require("webpack").container.ModuleFederationPlugin, [
      {
        name: "basket",
        filename: "remoteEntry.js",
        exposes: {
          "./Basket": "./src/components/Basket.vue",
        },
        shared: require("./package.json").dependencies,
      },
    ]);
  },
})
remote 컴포넌트 사용하기
module federation에서는 엔트리를 비동기로 가져오는 것을 추천하고있다. bootstrap.js를 생성하고 main.js에서 이 파일을 엔트리로 가져오게 변경한다.
// bootstrap.js
import { createApp } from "vue";
import App from "./App.vue";
createApp(App).mount("#app");

// main.js
import("./bootstrap");
remote가 떠있지 않을 수도 있기 때문에 defineAsyncComponent를 사용해서 컨테이너를 불러와서 사용한다.
<template>
  <div>
    <div>
      <div style="border: solid; border-color: red; width: 700px">
        <h1>Header</h1>
      </div>
    </div>

    <div style="display: flex; height: 300px">
      <div class="menu">
        menu
        <Chicken/>
      </div>
      <div class="basket">
        basket
        <Basket/>
      </div>
    </div>
    <div class="calculator" style="border: solid; border-color: pink; width: 700px; margin-top: 20px;">
      calculator
      <Calculator/>
    </div>
  </div>
</template>

<script>
import { defineComponent, defineAsyncComponent } from "vue";

export default defineComponent({
  name: "App",
  components: {
    Chicken: defineAsyncComponent(() => import("menu/Chicken")),
    Basket: defineAsyncComponent(() => import("basket/Basket")),
    Calculator: defineAsyncComponent(() => import("menu/Calculator")),
  },
});
</script>

<style>
.menu {
  border: solid;
  border-color: green;
  width: 500px;
  height: 100%;
}
.basket {
  border: solid;
  border-color: blue;
  width: 200px;
  height: 100%;
}
</style>
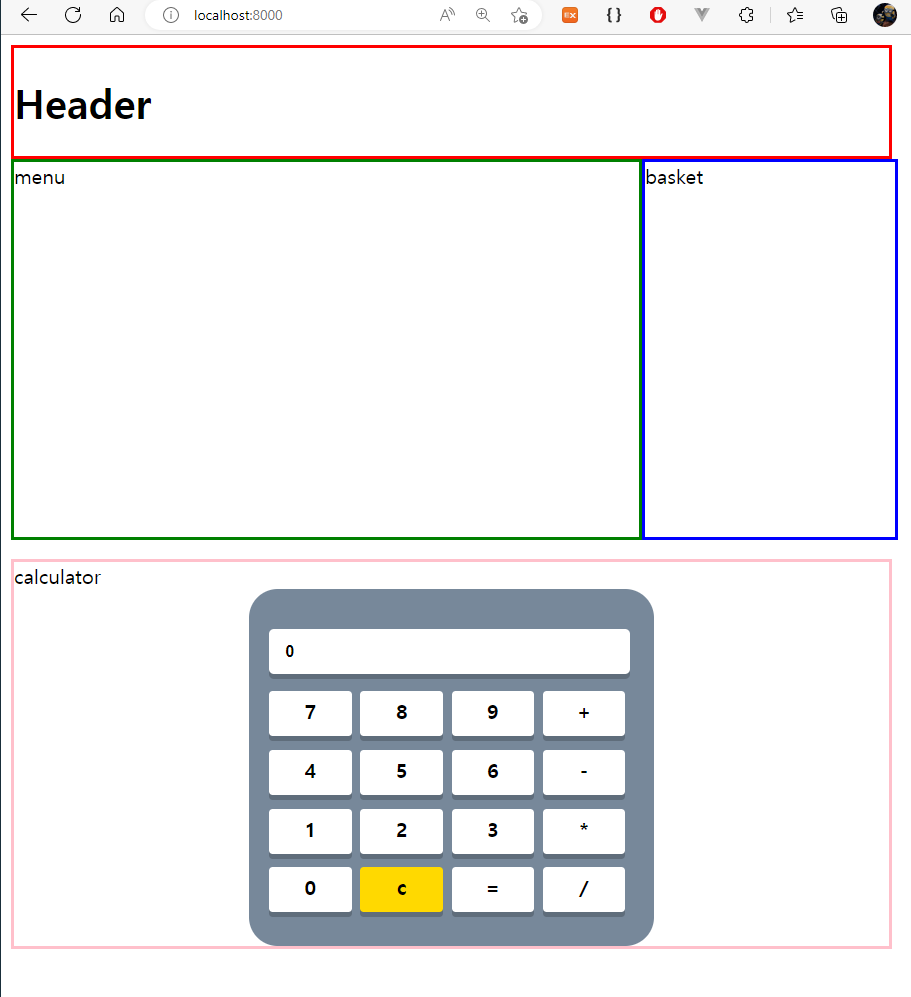
1차 화면 렌더링
만약 화면에 오류가 나올경우, 해당 화면의 레이아웃을 그리지 않는다.
응용 - Vuex를 붙여보자
- 먼저 각 모듈에 vuex를 설치
- app 모듈에 스토어 설정을 한다.
store/index.js
import { createStore } from "vuex";
import basket from "./modules/basket";

export default createStore({
  modules: {
    basket,
  },
});

export { basket };
store/modules/basket.js
export default {
    state: () => ({
      menus: [],
    }),
    mutations: {
      addMenu(state, value) {
        state.menus.push(value);
      },
    },
    getters: {
      menus(state) {
        return state.menus;
      },
      totalPrice(state) {
        return state.menus.reduce((sum, value) => sum + value.price, 0);
      },
    },
};
bootstrap.js
// bootstrap.js
import { createApp } from "vue";
import App from "./App.vue";
import store from "./store";
createApp(App).use(store).mount("#app");
app의 스토어를 다른 모듈에서 사용할 수 있도록 exposes를 설정한다.
const { defineConfig } = require('@vue/cli-service')
module.exports = defineConfig({
  transpileDependencies: true,
  devServer: {
    port: 8000, // 8001, 8002
  },
  publicPath: "http://localhost:8000",
  chainWebpack: (config) => {
    config.optimization.delete("splitChunks");
    config.plugin("module-federation-plugin").use(require("webpack").container.ModuleFederationPlugin, [
      {
        name: "main",
        remotes: {
          menu: "menu@http://localhost:8001/remoteEntry.js",
          basket: "basket@http://localhost:8002/remoteEntry.js",
        },
        exposes: {
          "./Store": "./src/store/modules/basket",
        },
        shared: require("./package.json").dependencies,
      },
    ]);// 다른 모듈도 store를 사용할 수 있도록 expose 설정
  },
})
menu/vue.config.js
const { defineConfig } = require('@vue/cli-service')
module.exports = defineConfig({
  transpileDependencies: true,
  devServer: {
    port: 8001,
  },
  publicPath: "http://localhost:8001",
  chainWebpack: (config) => {
    config.optimization.delete("splitChunks");
    config.plugin("module-federation-plugin").use(require("webpack").container.ModuleFederationPlugin, [
      {
        name: "menu",
        filename: "remoteEntry.js",
        exposes: {
          "./Chicken": "./src/components/Chinken.vue",
          "./Calculator": "./src/components/calculator.vue",
        },
        remotes: {
          main: "main@http://localhost:8000/remoteEntry.js",
        },
        shared: require("./package.json").dependencies,
      }
    ]);
  },
})
basket/vue.config.js
const { defineConfig } = require('@vue/cli-service')
module.exports = defineConfig({
  transpileDependencies: true,
  devServer: {
    port: 8002,
  },
  publicPath: "http://localhost:8002",
  chainWebpack: (config) => {
    config.optimization.delete("splitChunks");
    config.plugin("module-federation-plugin").use(require("webpack").container.ModuleFederationPlugin, [
      {
        name: "basket",
        filename: "remoteEntry.js",
        exposes: {
          "./Basket": "./src/components/Basket.vue",
        },
        remotes: {
          main: "main@http://localhost:8000/remoteEntry.js",
        },
        shared: require("./package.json").dependencies,
      },
    ]);
  },
})
각 store/index.js에 remote의 Store 등록 menu/store/index.js + basket/store/index.js
import { createStore } from "vuex";
import basket from "main/Store";

export default createStore({
  modules: {
    basket,
  },
});
menu/chicken.vue
<template>
    <div>
      <h2>메뉴</h2>
      <h3>치킨</h3>
      <ul>
        <li v-for="(menu, index) in menus" :key="index">
           : 원
          <button @click="addMenu(menu)">담기</button>
        </li>
      </ul>
    </div>
  </template>

  <script>
  import { defineComponent, reactive } from "vue";
  import { useStore } from "vuex";

  export default defineComponent({
    name: "MyChicken",
    setup() {
      const menus = reactive([
        { name: "후라이드", price: 10000 },
        { name: "양념", price: 11000 },
        { name: "반반", price: 11000 },
      ]);

      const store = useStore();
      const addMenu = ({ name, price }) => store.commit("addMenu", { name, price });

      return { menus, addMenu };
    },
  });
  </script>
basket/basket.vue
<template>
  <div>
    <h2>장바구니</h2>
    <ul>
      <li v-for="(menu, index) in menus" :key="index"> : </li>
    </ul>
    <h3>총 : </h3>
  </div>
</template>

<script>
import { defineComponent, computed } from "vue";
import { useStore } from "vuex";

export default defineComponent({
  name: "MyBasket",
  setup() {
    const store = useStore();
    const menus = computed(() => store.getters.menus);
    const totalPrice = computed(() => store.getters.totalPrice);

    return { menus, totalPrice };
  },
});
</script>
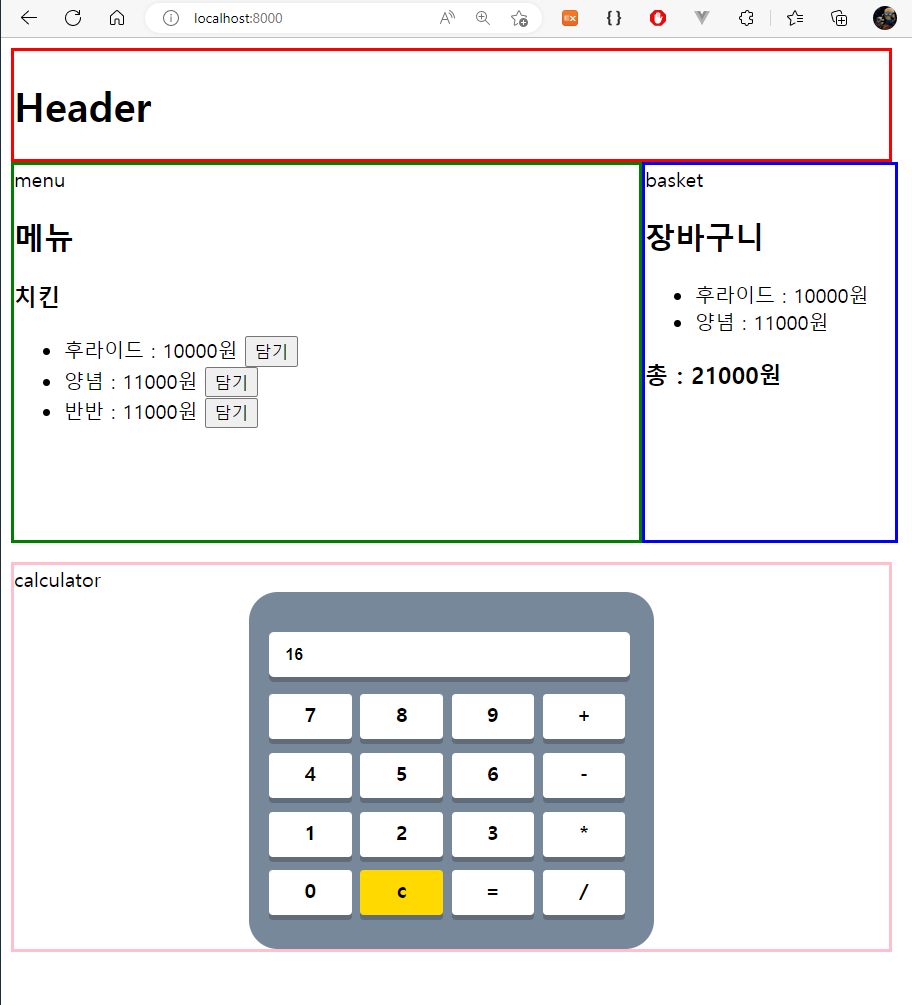
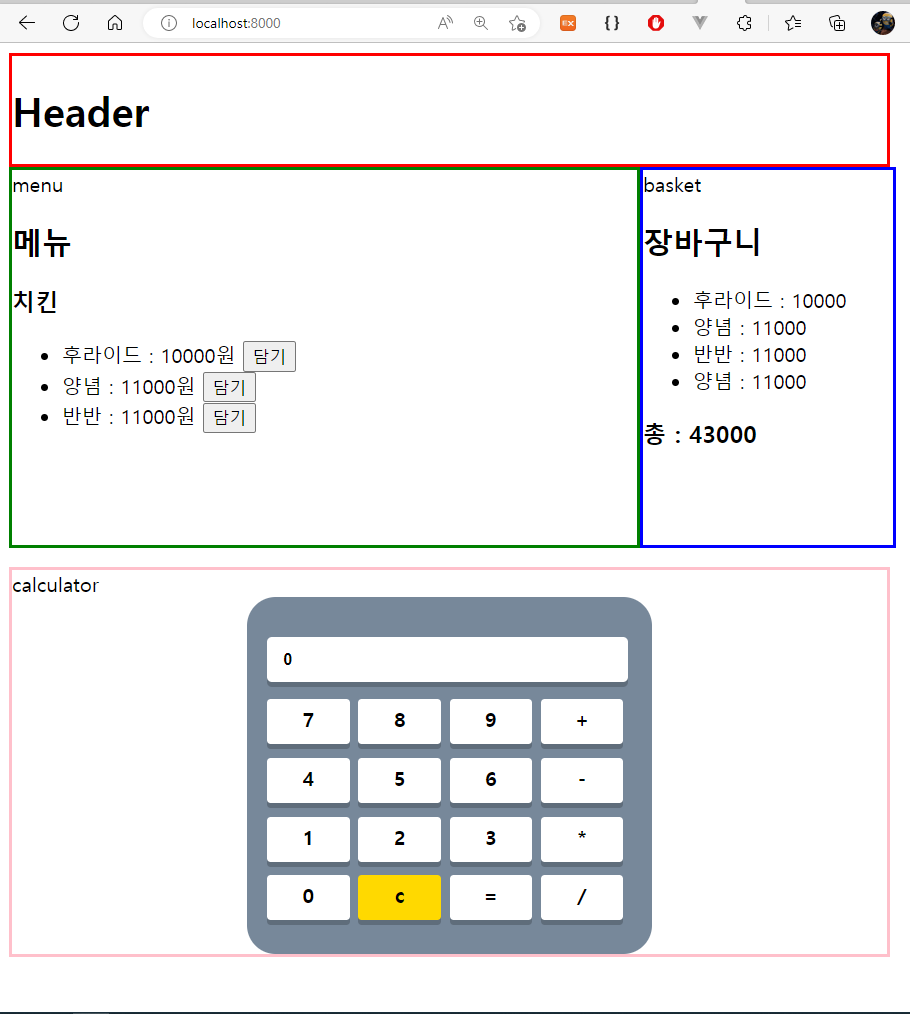
완성 화면
PS. 라우팅도 비슷한 설정으로 된다고 한다.